Provision a Red Hat OpenShift Classic Cluster
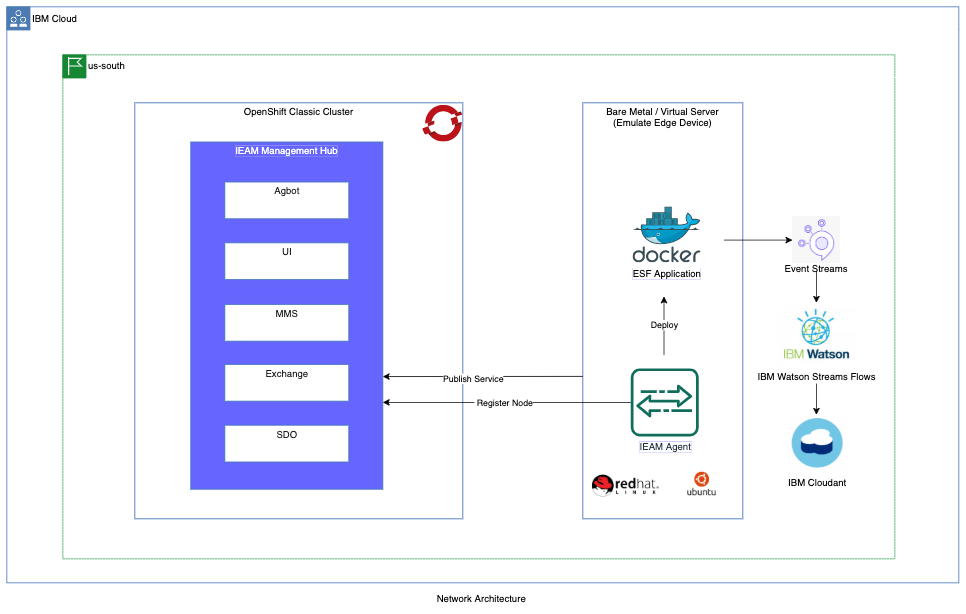
This page contains the terraform and IBM schematics code to provision Red Hat OpenShift Classic cluster, Bare Metal Server, Virtual Server, IBM Cloudant database, and IBM Event Streams.
Below is the network architecture of the IBM Edge components produced by this project code.
Navigation
- Prerequisites
- Initialize
- Using Terraform
or, - (Recommended) Using Schematics
- Validation
Prerequisites
The requirements are documented in the Environment Setup. It includes:
- Have an IBM Cloud account with required privileges
- Install IBM Cloud CLI
- Install the IBM Cloud CLI Plugins
infrastructure-service,schematicsandcontainer-registry. - Log in to IBM Cloud with the CLI
- Install Terraform
- Configure access to IBM Cloud for Terraform and the IBM Cloud CLI
- Install IBM Cloud Terraform Provider
- Install the following tools:
The IBM Cloud Terraform provider must be version 1.8.0 or later. This example is using Terraform version 0.12.0.
Initialize
-
Create
workspacedirectory in your local linux/mac box. Download IBM-Edge-Workshop project code.mkdir <your_home_dir>/workspace cd <your_home_dir>/workspace git clone https://github.com/IBM/IBM-Edge-Workshop.git cd IBM-Edge-Workshop/iac -
Execute the commands in below to validate the ibm cloud, terraform and schematics CLI version.
ibmcloud --version ibmcloud plugin show infrastructure-service | head -3 ibmcloud plugin show schematics | head -3 ibmcloud target terraform version ls ~/.terraform.d/plugins/terraform-provider-ibm_* echo $IC_API_KEY -
Create the IBM Cloud API Key as in below.
 # Create a new one and export it as environment variable
 ibmcloud iam api-key-create TerraformKey -d "API Key for Terraform" --file ~/ibm_api_key.json
 export IC_API_KEY=$(grep '"apikey":' ~/ibm_api_key.json | sed 's/.*: "\(.*\)".*/\1/')
Using Terraform
-
A sample
terraform.tfvarsfile is provided with this example. This file creates resources in Dallas region in single zone. A multi-zone sample file is available in multizone directory.Note: Please replace the values of the variables as per your project requirement. It is advisable to not to commit
terraform.tfvarsfile since it may contain sensitive information like password.**project_name = "iac-example" environment = "dev" resource_group = "iac-example-rg" region = "us-south" additional_zone_names = [] public_vlan_id = "123456" private_vlan_id = "234566" enable_public_service_endpoint = "true" enable_private_service_endpoint = "true" additional_zone_public_service_endpoint = [] additional_zone_private_service_endpoint = [] ... -
Set the api key variables iaas_classic_username and iaas_classic_api_key. Use below command to get the value of VLAN variables public_vlan_id, private_vlan_id, additional_zone_public_service_endpoint and additional_zone_private_service_endpoint.
ibmcloud sl vlan list -d <zone_name> -
Execute below Terraform commands to provision the infrastructure.
terraform init # Initialize the terraform working directory. terraform plan # Create the terraform execution plan. terraform apply # Apply the terraform plan to reach to the desired state. -
Optional: In case you want to clean up the infrastructure, execute below Terraform command.
terraform destroy # Destroy the infrastructure produced by terraform.
Using Schematics
Schematics delivers the Terraform as a Service. Below are the steps to create and run schematics workspace to provision cloud resources.
-
A sample
workspace-workshop.jsonfile is provided with this example. This file creates resources in Dallas region in single zone. A multi-zone sample file is available in multizone directory.Note: Please replace the values of the variables as per your project requirement. It is advisable to not to commit
workspace-workshop.jsonfile since it may contain sensitive information like password.**... "template_repo": { "url": "https://github.com/gargpriyank/ieam42-automation" }, "template_data": [ { "folder": ".", "type": "terraform_v0.12", "variablestore": [ { "name": "project_name", "value": "sandbox-edge", "type": "string" }, { "name": "environment", "value": "workshop", "type": "string" }, { "name": "resource_group", "value": "sandbox-edge-workshop-rg", "type": "string" }, { "name": "region", "value": "us-south", "type": "string" }, { "name": "datacenter", "value": "dal12", "type": "string" }, { "name": "machine_type", "value": "b3c.8x32", "type": "string" }, { "name": "additional_zone_names", "value": "[]", "type": "list(string)" }, { "name": "public_vlan_id", "value": "2852297", "type": "string" }, { "name": "private_vlan_id", "value": "2852299", "type": "string" }, { "name": "additional_zone_public_service_endpoint", "value": "[]", "type": "list(string)" }, ... -
Set the api key variables iaas_classic_username and iaas_classic_api_key. Use below command to get the value of VLAN variables public_vlan_id, private_vlan_id, additional_zone_public_service_endpoint and additional_zone_private_service_endpoint.
ibmcloud sl vlan list -d <zone_name> -
Execute the below Schematics commands to create the plan and execute it. Set the api key variable
ibmcloud_api_keybefore creating the plan.# Create workspace: ibmcloud schematics workspace list ibmcloud schematics workspace new --file workspace-workshop.json # Create the new workspace. ibmcloud schematics workspace list # List all the workspaces. # Create plan: ibmcloud schematics plan --id $WORKSPACE_ID # Create the schematics plan. ibmcloud schematics logs --id $WORKSPACE_ID --act-id Activity_ID # Apply plan: ibmcloud schematics apply --id $WORKSPACE_ID # Apply the schematics plan to reach to the desired state. ibmcloud schematics logs --id $WORKSPACE_ID --act-id Activity_ID -
Optional: Execute below Schematics command to destroy the infrastructure.
 ibmcloud schematics destroy --id $WORKSPACE_ID  # Destroy the cloud resources associated to the workspace.
 ibmcloud schematics logs  --id $WORKSPACE_ID --act-id Activity_ID

 ibmcloud schematics workspace delete --id $WORKSPACE_ID  # Delete the schematics workspace.
 ibmcloud schematics workspace list
Validation
After the infrastructure is provisioned, validate it using one of the Terraform or Schematics commands.
-
Execute the below commands to get the Terraform output and cluster info.
terraform output ibmcloud ks cluster config --cluster $(terraform output cluster_id) -
Execute the below commands to get the Schematics output and cluster info.
ibmcloud schematics workspace list # Identify the WORKSPACE_ID ibmcloud schematics workspace output --id $WORKSPACE_ID --json ibmcloud ks cluster config --cluster $(ibmcloud schematics output --id $WORKSPACE_ID --json | jq -r '.[].output_values[].cluster_id.value') -
Use below
occommands to verify the cluster, node and pods info.oc cluster-info oc get nodes oc get pods -A